Chromebooks have become increasingly popular for their simplicity, affordability, and security. Whether you’re a student, professional, or casual user, capturing a screenshot can be an essential skill. Screenshots allow you to save information, share content, or document issues quickly. If you’re wondering how to take a screenshot on a Chromebook, this guide will cover all methods step by step.
What is a Screenshot?
A screenshot is essentially a picture of whatever is currently on your screen. It can include your entire display or just a portion of it. Screenshots are helpful for:
- Saving online receipts or confirmations
- Sharing errors or technical issues
- Capturing images, text, or important content
- Creating tutorials or presentations
Chromebooks make it easy to capture screenshots without any third-party apps, thanks to built-in keyboard shortcuts and tools.
How to Take a Full-Screen Screenshot on a Chromebook
The simplest way to capture your entire screen is by using a keyboard shortcut. Here’s how:
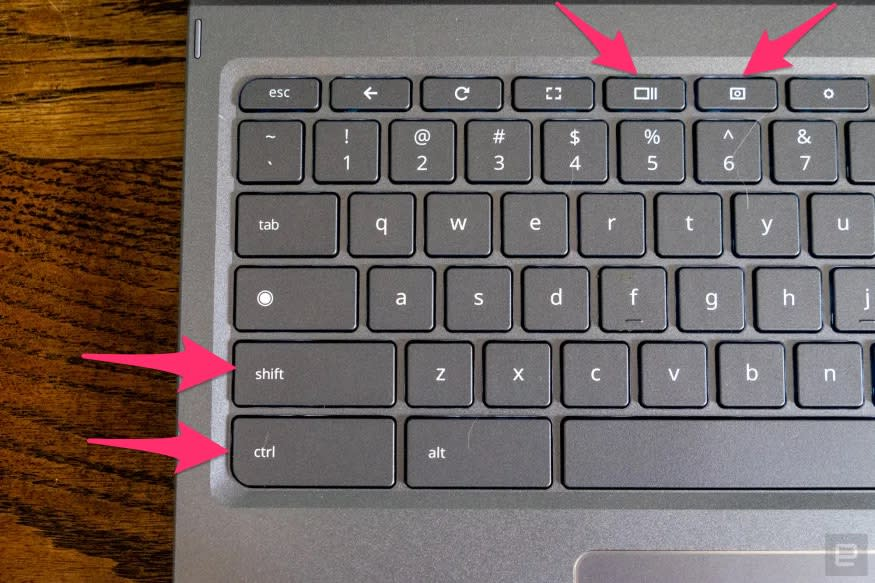
- Locate the “Show Windows” key on your Chromebook keyboard. It usually looks like a rectangle with two lines next to it and is found in the top row.
- Press
Ctrl + Show Windowssimultaneously. - Your screen will flash briefly, indicating that the screenshot has been taken.
- The screenshot is automatically saved to the Downloads folder and can be accessed through the Files app.
Tips for Full-Screen Screenshots
- Make sure everything you want to capture is visible on your screen before pressing the keys.
- You can quickly open the screenshot from the notification that appears after taking it.
How to Take a Partial Screenshot on a Chromebook
Sometimes, you may not need the entire screen—just a specific area. Chromebook allows you to capture a portion of your screen easily:
- Press
Ctrl + Shift + Show Windowssimultaneously. - Your cursor will turn into a crosshair.
- Click and drag to select the area you want to capture.
- Release the mouse button to take the screenshot.
The selected portion will be saved automatically in your Downloads folder.
Benefits of Partial Screenshots
- Capture only the information you need.
- Avoid clutter or unnecessary data.
- Useful for tutorials, guides, or highlighting specific areas.
How to Take a Screenshot of a Single Window
If you want to capture only one app or browser window, you can do this without including the rest of your screen:
- Click on the window you want to capture.
- Press
Ctrl + Alt + Show Windows. - Your mouse cursor will appear as a crosshair. Click on the window to capture it.
This method is particularly useful for work presentations or saving important app data.
Using the Chromebook Screenshot Tool
Chromebooks also include a dedicated screenshot tool that makes capturing and managing screenshots easy:
- Press
Ctrl + Shift + Overview(orCtrl + Shift + Show Windows). - A small toolbar will appear at the bottom of the screen. You can choose from:
- Full-screen screenshot
- Partial screenshot
- Window screenshot
- Select the option you need and capture your screen.
The tool also allows you to edit screenshots, such as cropping or annotating them, before saving.
Taking Screenshots Using a Touchscreen Chromebook
If you own a Chromebook with a touchscreen, there’s an even easier method:
- Full-Screen Screenshot: Press
Power + Volume Downsimultaneously. - Partial Screenshot: Press
Power + Ctrl + Volume Down, then drag to select the area.
This method is similar to how you capture screenshots on smartphones and is perfect for touch-friendly devices.
How to Access and Manage Your Screenshots
Once captured, your screenshots are automatically saved in the Downloads folder. Here’s how to access them:
- Open the Files app from your Chromebook’s app menu.
- Navigate to the Downloads folder.
- Click on the screenshot to open or edit it.
Tips for Managing Screenshots
- Rename files for easy reference.
- Move screenshots to Google Drive for backup.
- Use the Gallery app for quick viewing and simple edits.
How to Edit Screenshots on a Chromebook
Chromebooks provide built-in tools for editing screenshots:
- Crop: Trim unwanted areas from the screenshot.
- Annotate: Add text, shapes, or highlights for clarity.
- Share: Send screenshots via email, Google Drive, or social media.
Editing is straightforward using the Screenshot toolbar or the Gallery app.
Common Chromebook Screenshot Issues and Fixes
Even though taking a screenshot on a Chromebook is easy, users may encounter occasional problems. Here are some common issues:
Screenshot Not Saving
- Check if your Downloads folder is full or if storage is limited.
- Restart your Chromebook and try again.
Keyboard Shortcuts Not Working
- Ensure you’re pressing the correct combination:
Ctrl + Show Windowsfor full screen, orCtrl + Shift + Show Windowsfor partial screenshots. - Some Chromebook models may have slightly different keys; consult your device manual.
Screenshot Toolbar Missing
- Update your Chromebook to the latest Chrome OS version.
- Press
Ctrl + Shift + Show Windowsto manually bring up the toolbar.
How to Share Chromebook Screenshots
Sharing screenshots is simple:
- Open the screenshot in the Gallery app or Files app.
- Click Share and choose from options like email, Google Drive, or messaging apps.
- You can also drag and drop the screenshot into a chat or document.
Chromebook Screenshot Shortcuts Summary
| Screenshot Type | Shortcut |
|---|---|
| Full screen | Ctrl + Show Windows |
| Partial screen | Ctrl + Shift + Show Windows |
| Single window | Ctrl + Alt + Show Windows |
| Touchscreen full screen | Power + Volume Down |
| Touchscreen partial | Power + Ctrl + Volume Down |
Why Chromebook Screenshots Are Useful
- Quick Sharing: Instantly share work, notes, or images with others.
- Documentation: Capture important information or records.
- Education: Students can save notes, assignments, or research materials.
- Problem-Solving: Capture errors or technical issues to show support teams.
READ ABOUT:
High Risk Merchant Account at HighRiskPay.com
Conclusion
Knowing how to take a screenshot on a Chromebook is a valuable skill for work, study, and everyday tasks. Whether you need a full-screen capture, a specific window, or a partial screenshot, Chromebooks provide multiple convenient methods. Using keyboard shortcuts, the Screenshot tool, or touchscreen features makes capturing and managing screenshots simple and efficient.
By following this guide, you can quickly capture, edit, and share screenshots, making your Chromebook experience even more productive. Start practicing these techniques today, and you’ll never struggle to save important information again!